Search

shirishweb

talk less, code more

Category

System Administration

When to automate?

time to build automation < (time to perform without automation x number of times task performed without automation)

Today I happen to learn the above formula and wanted to share it to the readers.

So basically, according to the formula, it is best to automate only if we can build the automated system in the time less than what it would have taken without automation. Fairly simple mathematics.

Let’s get into an example.

Let’s say an e-commerce company is manually entering the customer details after the order is received. On average, the company receives 50 orders/day and for each order, staff would take 5 minutes.

ie,

50 * 5 = 250 minutes = 3 hours and 10 mins /day

If we assume to automate this task it would take 5 days, then

5 days / 250 mins = 5 * 24 * 60 / 250 = 28.8

That means the company would be benefited after the 29th days because of this automation process.


Python Django: Using multiple database, inspectdb and admin for existing database

One of the most powerful parts of Django is the automatic admin interface. It allows all users including developers to manipulated data inside database table. Often people use django admin tool to manage their database rather than using the console management tool provided by the database software itself or any other tool which are very limited and specific to one type of database only.

I have an existing setup mysql database with all the required schema and stored data. I want to use Django’s powerful administration tool to manage some of the stuffs on the database.

Lets get started on.

I have setup a django project called boad with necessary configurations updated in the settings.py file. I have added my mysql server as default database for the project.

Since running migration using django management command would create default django tables like django_sessions, django_migrations etc on my database which I dont like as I would like to keep my database very neat and clean as it was prior to django setup. So I decided to use django multiple database feature using database router that would route database operations of all other django related table to other database. I have setup a database router which will route read,write and syncdb operation of all tables not related to my existing database.

First in my settings.py I set up two databases as:

DATABASES = {
    'sqlite': {
        'ENGINE': 'django.db.backends.sqlite3',
        'NAME': os.path.join(BASE_DIR, 'db.sqlite3'),
    },
    'default': {
        'ENGINE': 'django.db.backends.mysql',
        'HOST': 'localhost'
        'USER': 'root',
        'PASSWORD': '',
        'NAME': 'boad_database'
    }
}

DATABASE_ROUTERS = ['boad.router.NonBoadAttributeRouter',] #Router's module path

I have used two database sqlite and mysql (default). I would be using sqlite to store data that are specific to django tables.

I created a router.py file in the project module directory as:

class NonBoadAttributeRouter:

    non_boad_attribute_tables = ['auth', 'admin', 'contenttypes', 'sessions', 'messages', 'staticfiles', 'migrations']
    def db_for_read(self, model, **hints):
        if model._meta.app_label in self.non_boad_attribute_tables:
            return 'sqlite'
        return None

    def db_for_write(self, model, **hints):
        if model._meta.app_label in self.non_boad_attribute_tables:
            return 'sqlite'
        return None

    def allow_relation(self, obj1, obj2, **hints):
        if obj1._meta.app_label in self.non_boad_attribute_tables or obj1._meta.app_label in self.non_boad_attribute_tables:
            return True
        return None

    def allow_migrate(self, db, app_label, model_name=None, **hints):
        if app_label in self.non_boad_attribute_tables:
            return db=='sqlite'
        return None

Here I have stated that if application label is either of labels defined in non_boad_attribute_tables python variable, they should operate by “sqlite” database. Each router’s function would check for app label and route to “sqlite” database as per required or would return “None” which would tell django to fall back to “default” database for database operation.

Django have an “inspectdb” management command which is very useful to generate Django model from the existing database. As an example here I have use inspectdb to generate model for my course_category table in mysql.

venv) D:\Learnings\Django\boad\src>python manage.py inspectdb course_category
# This is an auto-generated Django model module.
# You'll have to do the following manually to clean this up:
# * Rearrange models' order
# * Make sure each model has one field with primary_key=True
# * Make sure each ForeignKey has `on_delete` set to the desired behavior.
# * Remove `managed = False` lines if you wish to allow Django to create, modify, and delete the table
# Feel free to rename the models, but don't rename db_table values or field names.
from __future__ import unicode_literals

from django.db import models


class CourseCategory(models.Model):
 course_cat_id = models.AutoField(primary_key=True)
 coursename = models.CharField(max_length=100)
 code = models.CharField(max_length=10, blank=True, null=True)
 project = models.CharField(max_length=30, blank=True, null=True)
 created_by = models.CharField(max_length=60)
 created_date = models.DateTimeField()
 deleted_by = models.CharField(max_length=60)
 deleted_date = models.DateTimeField(blank=True, null=True)
 deleted = models.IntegerField()

class Meta:
 managed = False
 db_table = 'course_category'

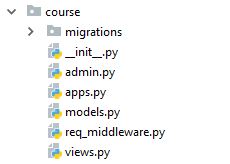
I have generated an model from existing database. I can do same for other mysql tables and create put it inside their own respective django app created using

python manage.py startapp courses

app_str

Now finally in admin.py file of each django app folder, I have register each model in admin as:

# -*- coding: utf-8 -*-
from __future__ import unicode_literals

from django.contrib import admin

from course.models import CourseCategory

class CourseCategoryAdmin(admin.ModelAdmin):
    list_display = ['course_cat_id', 'coursename', 'code', 'project']
    list_filter = ['project',]
    list_editable = ['code',]

admin.site.register(CourseCategory, CourseCategoryAdmin)


Running django’s migration command wont create any other tables in my mysql database but instead will be created in other sqlite database.

After successful migration I can test my django app using:

python manage.py runserver

course_admin_interfaceI can now successfully setup admin interface for managing my mysql database.

This approach of creating admin interface is applicable to most of popular database systems like Oracle, postgres etc. Django is going more popular day by day and equally getting more recognition for its quick and powerful admin interface generation.

Dumping(backing) and restoring database [PostgreSQL, MongoDB, MySQL]

A database backup and recovery plan is creating backup copies of data. When error (internal exception within the DBMS, Application (or transaction) failures, damage to disk storage devices, file system failures, tape degradation or damage, and deleted data files) occur that damages the integrity of the database, a backup copy of the data can be used as the basis to recover or restore the database. When problems impact the database, the DBA can use the copy backups and the database log to recover the database. Whatever the cause of the problem, the DBA must be able to recover data quickly so that the business can continue to operate. In this article, I will teach how simply we can backup and restore any particular database (PostgreSQL, MongoDB, MySQL)

PostgreSQL database backup and restore

pg_dump is a utility for backing up a PostgreSQL database. pg_dump can be used to backup an database or any specific table, then pg_restore can be used select which parts of the database are to be restored.

Scenario: I have a postgres database instance running at server 192.168.1.23 with one of the database named as “my_dbname”.

We need to store postgres server password in PGPASSWORD variable of the console

PGPASSWORD=my_pass (In Linux)

set PGPASSWORD=my_pass (In Windows)

pg_dump -h 192.168.1.23 -U my_username -Fc my_dbname > pg_my_dbname_backup

Make sure that the postgres binary pg_dump is in your environment variable. If not, you need to change your current directory to the postgres binary folder.

-Fc option denotes that we are using custom dump format. We can use following format according to the need

  1. -Fp for plain format
  2. -Fd for directory format
  3. -Ft for tar format

Also we can use -j <no_of_jobs> for parallel jobs executing which could be useful if dumping requires use executing time.

Instead of output redirection ” > pg_my_dbname_backup” we can specify dumped filename using -f option as

-f pg_my_dbname_backup

pg_dump also allows dumping of specific table using -t option as

-t my_tablename

For full options or full documentation on using pg_dump I recommend to go through official postgres pg_dump documentation page.

If you want to create a routine backup script this wiki has some tips on it which provides a demo script for windows user as:

@echo off
for /f “tokens=1-4 delims=/ ” %%i in (“%date%”) do (
set dow=%%i
set month=%%j
set day=%%k
set year=%%l
)
set datestr=%month%_%day%_%year%
echo datestr is %datestr%

set BACKUP_FILE=<NameOfTheFile>_%datestr%.backup
echo backup file name is %BACKUP_FILE%
SET PGPASSWORD=<PassWord>
echo on
pg_dump -h <HostName> -p 5432 -U <UserName> -F c -b -v -f %BACKUP_FILE% <DATABASENAME>

Let’s say we have some error or problem in our database “my_dbname” and we need to restore it back from our backup file.

First we need to delete the existing erroneous database and create a fresh empty database of same name.

dropdb -h 192.168.1.23 -U my_username my_dbname

createdb -h 192.168.1.23 -U my_username my_dbname

Now we got a fresh empty “my_dbname” database where we can restore our backup into it

pg_restore -h 192.168.1.23 -U my_username -d my_dbname pg_my_dbname_backup

we need to make sure that “pg_my_dbname_backup” is in current directory or could be replace with the path of the database file.

pg_restore can be used with option -C which could allow creation of the database also before restoring. i.e we can use option -C which would eliminate the use of createdb command before pg_restore

MongoDB database backup and restore

mongodump is a utility for creating a binary export of the contents of a mongo database. mongodump can export data from either mongod or mongos instances. mongodump captures the documents in the database in its backup data

I can create a backup directory called “mongodb_backup” using mongodump utility as

mongodump –host 192.168.1.23:27017 –out mongodb_backup

We can add

–db database_name to backup only database_name database

–collection collection_name to backup only collection_name collection

–username my_username –password my_password if need authentication for instance connection

–excludeCollection Collection_name to exclude any specific collection to be dumped

–archive my_mongo_dump.archive for dump in archive format

–gzip to dump in gzip format rather than directory

More on mongodump can be found in official documentation

Same way we can restore of dumped (backed up) database into running mongo instance using mongorestore as

mongorestore mongodb_backup

mongorestore can be used with same options as provided above for mongodump

More on mongorestore can be found in official documentation

MySQL database backup and restore

MySQL too provides a tool mysqldump to dump/backup any database

mysqldump -h 192.168.1.23 -u my_username -p my_password my_dbname > mysql_backup.sql

If we need a gzip format we can pipe it to our gzip command before output redirection as

mysqldump -h 192.168.1.23 -u my_username -p my_password my_dbname | gzip -9 > mysql_backup.sql.gzip

For restoring mysql database we need to make sure that restoring database exist and is empty.

mysql -u my_username -p my_password my_dbname < mysql_backup.sql

mysqlimport can also be used to import dumped mysql file as

mysqlimport -u my_username -p my_password my_dbname mysql_backup.sql

If we have a gzip format of dumped file we need to extract it before restore as

gunzip < mysql_backup.sql.gzip | mysql -u my_username -p my_password my_dbname

PowerShell is a task automation and configuration management framework from Microsoft, consisting of a command-line shell and associated scripting language. PowerShell is a very powerful tool for automating various windows tasks. Here we will learn to use powerShell as a commandline tool for creating archives (zip) files from folder containing files.

I am using windows 10 pc which comes with powershell version 5.1

I have a folder structure as follows.

I have a folder called Software Documentations with contains 7 files.

Using the explorer address bar, we can start a new powershell session using this current directory.

Since powershell leverages use of .net classes, we will use “System.IO.Compression.FileSystem” class and load it in powershell session as

Add-type -A System.IO.Compression.FileSystem

We will create instance of this class in a powershell variable called $cls

$cls = [IO.Compression.ZipFile]

Now lets see what static functions are provided by our ZipFile class

$cls | Get-Member -static

We can see that we have methods “CreateFromDirectory” and “ExtractToDirectory” which we are interested on.

Now lets begin creating zip file using method CreateFromDirectory

First we need to make sure we are in correct directory

ls

Lets save the directory path of our desired folder to be zipped (which is “3. Software Requirement Specification” in my case”) into powershell variable $source

$source = (gi '3. Software Requirement Specification').FullName

Make sure $source has some value in it

$source

Now lets use our static “CreateFromDirectory” method to convert this folder to a zip file called “myzip.zip”

$cls::CreateFromDirectory($source, "myzip.zip")

Yes, we verified we have a our zip file “myzip.zip” in the same directory.

Now lets demonstrate extracting same zipped file to a new folder “myzip_extracted” folder using “ExtractToDirectory” method provided by our $cls

$cls::ExtractToDirectory('myzip.zip', 'myzip_extracted')

And we can see that it worked and created myzip_extracted folder and put all my files from the zipped archive to this folder.

Deploying Django App using gunicorn and nginx on Linux (Ubuntu) server

According to official site,

Django is a free and open-source web framework, written in Python, which follows the model-view-template architectural pattern.

Nginx is a web server which can also be used as a reverse proxy, load balancer and HTTP cache.

We are going to use above technologies and deploy a sample Django app “dproject” with structure as

Djproject is the main Django project folder containing the import wsgi file, settings, urls. Djapp is my Django app and venv is python virtual environment folder where needed python packages and gunicorn is installed.

We can install gunicorn using pip as

pip install gunicorn

Now we will test if gunicorn can server our Django app or not

gunicorn –bind 0.0.0.0:81 dproject.wsgi

If that works well we can proceed on further creating a gunicorn service to serve my app on nginx server

Now we’ll create a system service that can manage above gunicorn process.

Create a file for the gunicorn service as

vim /etc/systemd/system/dproject_gunicorn.service

[Unit]
Descriptioin = Gunicorn Daemon for dproject
After = network.target

[Service]
User=gopal
Group=www-data
WorkingDirectory=/home/gopal/dproject
ExecStart=/home/gopal/dproject/venv/bin/gunicorn –access-logfile - --workers 3 –bind unix:/home/gopal/dproject/dproject.sock dproject.wsgi:application

[Install]
WantedBy=multi-user.target

Our service is dependent on network.target. We are using ‘gopal’ and ‘www-data’ as linux os user and group to serve our app. WorkingDirectory is pointed to our project directory.

ExecStart is a command line that will execute on service run. Here we have started our gunicorn process with 3 workers that will serve dproject through unix socket file.

We are also telling that we want our service to be managed by multiuser.target runlevel

Now we will allow our port 80 through firewall

ufw allow 80

Or

firewall-cmd –permanent –add-port=80/tcp
firewall-cmd –reload

Now we will start and enable our gunicorn service so that our service is started automatically after every boot

systemctl start dproject_gunicorn
systemctl enable dproject_gunicorn

Now we’ll create nginx configuration file for our Django app which is served through unix socket file dproject.sock via gunicorn

vim /etc/nginx/sites-available/dproject

server {
  listen: 80;
  servername dproject.com
  location /static/ {
    root /home/gopal/dproject;
  }
  location / {
    include proxy_params;
    proxy_pass http://unix:/home/gopal/dproject/dproject.sock;

We will enable this configuration file by creating a symlink to site-enabled directory of nginx configuration directory

ln –s /etc/nginx/sites-available/dproject /etc/nginx/sites-enabled/dproject

We will now test if our configuration is ok

nginx –t

It says “OK”

Now we will restart out nginx server and allow nginx ports in our firewall

systemctl restart nginx
ufw allow “Nginx Full”


Hunting for processes holding network port

Many times, we may encounter certain errors within the application showing some strange errors with network issues. Like XAMPP showing error when apache is started complaining that the port is already in use. In such case, we need to find which service/program is using the port and reconfigure the application/service as per the requirement.

Today I will be showing how to hunt for such process using the powershell in windows system step by step. Lets hunt for process holding the network port 80.

  • First start run and type in powershell to start powershell terminal1. Powershell in run
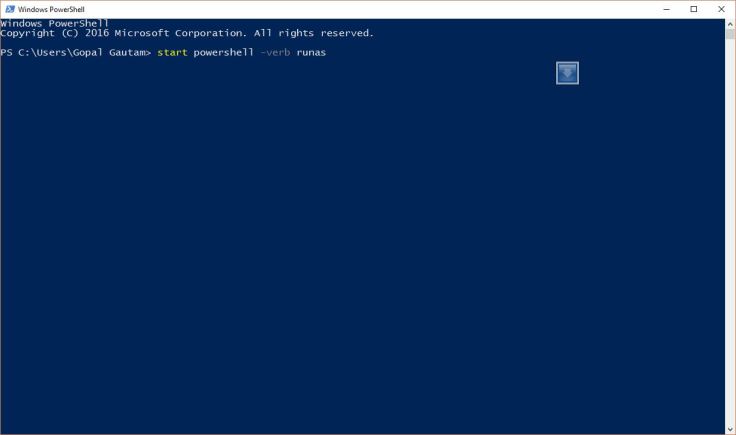
  • Run this command

start powershell -verb runas

2. Start powershell in elevated mode

  • to start another powershell terminal in elevated [administrator privileged mode]
  • Run command

netstat -aonb

3. Netstat command

  • to view all the listening / established / connected ports with details
  • Since this is a long list, looking for specific port might be difficult, so we cant search this list output by using command

    netstat -aonb | findstr :80

5. Grep 80 port from netstat

  • It shows that the process with PID 4088 is holding that port.
  • Now lets find the process with that PID ie 4088. To do this, we can any of two commands as

tasklist | findstr 4088

OR

Get-Process -PID 4088

6. Grep process with pid

  • Voila, we have hunted the process we are looking for. Now we know that port 80 is used by process httpd.exe.

Create a free website or blog at WordPress.com.

Up ↑