One of the most powerful parts of Django is the automatic admin interface. It allows all users including developers to manipulated data inside database table. Often people use django admin tool to manage their database rather than using the console management tool provided by the database software itself or any other tool which are very limited and specific to one type of database only.
I have an existing setup mysql database with all the required schema and stored data. I want to use Django’s powerful administration tool to manage some of the stuffs on the database.
Lets get started on.
I have setup a django project called boad with necessary configurations updated in the settings.py file. I have added my mysql server as default database for the project.
Since running migration using django management command would create default django tables like django_sessions, django_migrations etc on my database which I dont like as I would like to keep my database very neat and clean as it was prior to django setup. So I decided to use django multiple database feature using database router that would route database operations of all other django related table to other database. I have setup a database router which will route read,write and syncdb operation of all tables not related to my existing database.
First in my settings.py I set up two databases as:
DATABASES = {
    'sqlite': {
        'ENGINE': 'django.db.backends.sqlite3',
        'NAME': os.path.join(BASE_DIR, 'db.sqlite3'),
    },
    'default': {
        'ENGINE': 'django.db.backends.mysql',
        'HOST': 'localhost'
        'USER': 'root',
        'PASSWORD': '',
        'NAME': 'boad_database'
    }
}

DATABASE_ROUTERS = ['boad.router.NonBoadAttributeRouter',] #Router's module path
I have used two database sqlite and mysql (default). I would be using sqlite to store data that are specific to django tables.
I created a router.py file in the project module directory as:
class NonBoadAttributeRouter:

    non_boad_attribute_tables = ['auth', 'admin', 'contenttypes', 'sessions', 'messages', 'staticfiles', 'migrations']
    def db_for_read(self, model, **hints):
        if model._meta.app_label in self.non_boad_attribute_tables:
            return 'sqlite'
        return None

    def db_for_write(self, model, **hints):
        if model._meta.app_label in self.non_boad_attribute_tables:
            return 'sqlite'
        return None

    def allow_relation(self, obj1, obj2, **hints):
        if obj1._meta.app_label in self.non_boad_attribute_tables or obj1._meta.app_label in self.non_boad_attribute_tables:
            return True
        return None

    def allow_migrate(self, db, app_label, model_name=None, **hints):
        if app_label in self.non_boad_attribute_tables:
            return db=='sqlite'
        return None
Here I have stated that if application label is either of labels defined in non_boad_attribute_tables python variable, they should operate by “sqlite” database. Each router’s function would check for app label and route to “sqlite” database as per required or would return “None” which would tell django to fall back to “default” database for database operation.
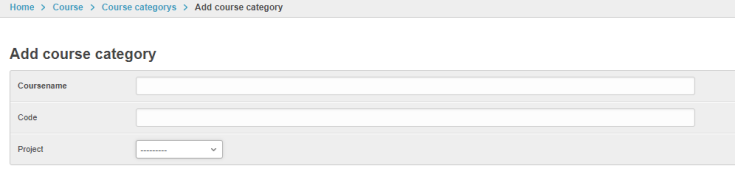
Django have an “inspectdb” management command which is very useful to generate Django model from the existing database. As an example here I have use inspectdb to generate model for my course_category table in mysql.
venv) D:\Learnings\Django\boad\src>python manage.py inspectdb course_category
# This is an auto-generated Django model module.
# You'll have to do the following manually to clean this up:
# * Rearrange models' order
# * Make sure each model has one field with primary_key=True
# * Make sure each ForeignKey has `on_delete` set to the desired behavior.
# * Remove `managed = False` lines if you wish to allow Django to create, modify, and delete the table
# Feel free to rename the models, but don't rename db_table values or field names.
from __future__ import unicode_literals

from django.db import models


class CourseCategory(models.Model):
 course_cat_id = models.AutoField(primary_key=True)
 coursename = models.CharField(max_length=100)
 code = models.CharField(max_length=10, blank=True, null=True)
 project = models.CharField(max_length=30, blank=True, null=True)
 created_by = models.CharField(max_length=60)
 created_date = models.DateTimeField()
 deleted_by = models.CharField(max_length=60)
 deleted_date = models.DateTimeField(blank=True, null=True)
 deleted = models.IntegerField()

class Meta:
 managed = False
 db_table = 'course_category'
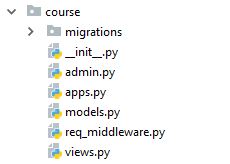
I have generated an model from existing database. I can do same for other mysql tables and create put it inside their own respective django app created using
python manage.py startapp courses
Now finally in admin.py file of each django app folder, I have register each model in admin as:
# -*- coding: utf-8 -*-
from __future__ import unicode_literals

from django.contrib import admin

from course.models import CourseCategory

class CourseCategoryAdmin(admin.ModelAdmin):
    list_display = ['course_cat_id', 'coursename', 'code', 'project']
    list_filter = ['project',]
    list_editable = ['code',]

admin.site.register(CourseCategory, CourseCategoryAdmin)
Running django’s migration command wont create any other tables in my mysql database but instead will be created in other sqlite database.
After successful migration I can test my django app using:
python manage.py runserver
 I can now successfully setup admin interface for managing my mysql database.
This approach of creating admin interface is applicable to most of popular database systems like Oracle, postgres etc. Django is going more popular day by day and equally getting more recognition for its quick and powerful admin interface generation.